Arma 3 Modo Plugin
|
Modo is ideal for modelling Arma 3 assets, and the modern and clean software architecture it
uses internally is perfect for representing the additional data that game assets require.
This plugin is a Modo kit for loading and saving Arma 2 and Arma 3 .p3d files.
The plugin is currently in closed beta testing and is not yet available for download.
The plugin requires Modo 901 or any later version.
The plugin is bundled as an .lpk kit installer. To install it, either: Once installed, you should be able to load and save .p3d files using the Open...,
Export As... and Save As items in the File menu. Although you can keep your models in .p3d format and load them later, Modo
retains extra editing information in .lxo save files that is often
useful for revising models. It is recommended that you keep the original .lxo model
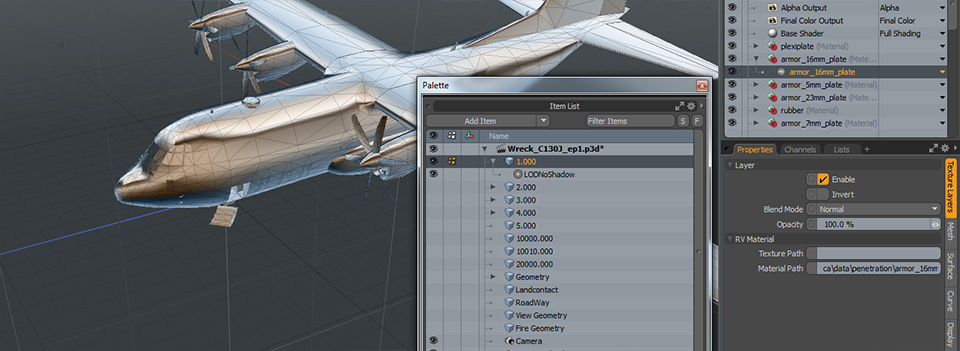
of your asset and use Export As... to produce a .p3d when required. To create a model suitable for exporting to .p3d, set up your
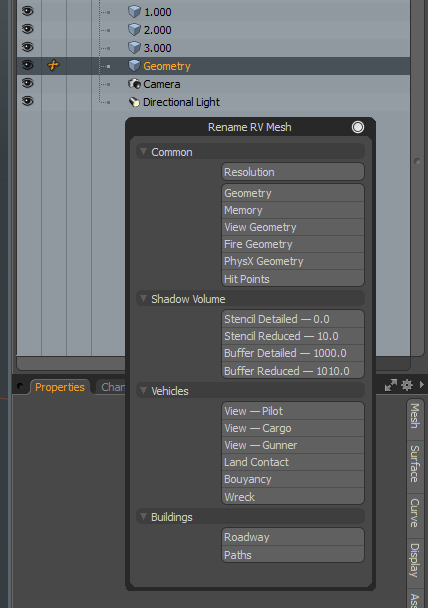
Modo scene the following way: Create a mesh for each LOD, and then name each mesh by selecting Rename RV Mesh from the
right click context menu on mesh items:
Meshes are exported even if they are not visible at the time of export. Mesh names can also be set manually; the naming scheme for meshes follows the same
scheme that is used in Object Builder. Meshes that do not match a valid LOD name are
excluded from the export. Examples of valid names are: Any resolutions not recognised by the plugin are imported as hexadecimal constants; hexadecimal constants
can also be used to export new or unsupported resolutions:
Create a selection set (vertex or face) for selections that
are fully weighted (for example, where you are animating solid objects,
creating hidden selections, or setting up memory points. For weighted selections (typically used for skinning characters) create
a weight map. In both cases, the name of the selection set and weight map are used as the
selection name when exported to a .p3d.
If the same vertex or face is in both a selection set and a weight map (with the
same name) then non-zero weight map values will overwrite the 100% weight implied
by the selection set.
Component selections (such as Component01) are automatically generated
for the following LOD meshes:
Any manually added (or imported) component selections are removed during
the export process and replaced with the automatic selections.
Use the Vertex Normal tools under the Game Tools layout to
make a vertex normal map. If a mesh has multiple vertex normal maps, the normal map
named Vertex Normal will be used first. The Vertex Map tools
automatically create a map with the name Vertex Normal.
If no vertex normal map is found, the normals are calculated by Modo internally by
using material smoothing angles and any smoothing groups. When using Modo's calculated
normals, a sharp edges set will not be generated.
Use the Vertex Normal tools under the Game Tools layout to
define hard and soft edges. If an edge selection set named HardEdges exists, it is exported as
.p3d sharp edges. The Vertex Map tools automatically creates this selection set. Sharp edges are discarded once your model is binarized, and it is likely that
they are only used for editing in Object Builder. If you have manually created
a normal map and don't intend to recalculate normals in Object Builder, you don't need
sharp edges. Create a UV map. If the mesh only has a single UV map then the name
of the map is ignored, and the default name (Texture) or any other name
can be used. However, if your mesh has more than one UV map, they must be named from 0 upwards, up
to 7 at the most. Any maps that are not numbered sequentially are not exported. Also, when setting up UV maps, keep in mind that Modo maintains a separate
list of UV maps for each mesh; creating or renaming a map in one mesh does
not change the map in any other mesh.
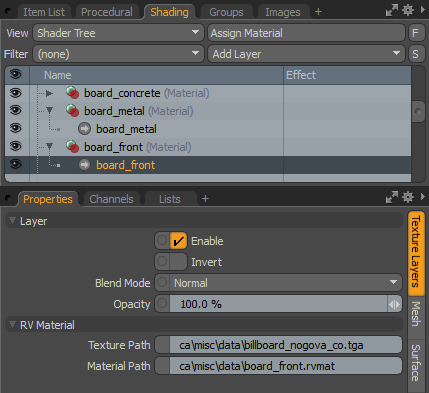
Set up your materials as you would for a normal Modo model. Then, create RV Material
nodes in the shader tree by clicking on Add Layer, and then Custom Materials,
and then RV Material. On export, the shader tree is evaluated bottom to top,
and the RV Material properties (Texture Path and Material Path) are
applied to any faces that match the shader tree groups that contain the RV Material
node.
The plugin ignores any node that isn't an RV Material or a Group. To
assist with modelling, you can create image map materials or any other kind of material in the
shader tree without affecting the exported .p3d.
RV Material nodes appear in the shader tree as follows:
Create a weight map with the name Mass in the Geometry LOD mesh.
The Set Value... command in the Vertex Map menu can be used
to set vertex weights.
If the mass weight map is missing (or not set to realistic values) the
model may float or fail to properly collide with other objects when placed in game.
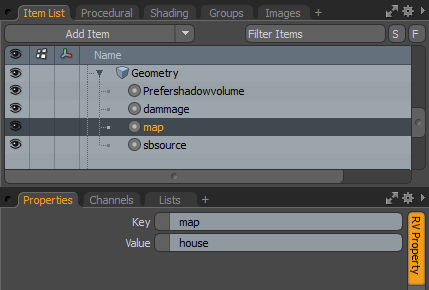
Create an RV Property item by clicking on the Add Item button, and then
on the RV Property item. Parent the property to the mesh that it should
apply to by dragging it under the mesh item in the item tree. To create proxies, create an RV Proxy item by clicking on
the Add Item button, and then on the Other sub-menu, and then on RV Proxy.
To select a model .p3d file for the proxy, click on the Browse... button in the
item properties:
An RV Proxy can be parented to any Skeleton bone. Proxies that are not parented
to a skeleton bone can be placed in any other part of the item tree.
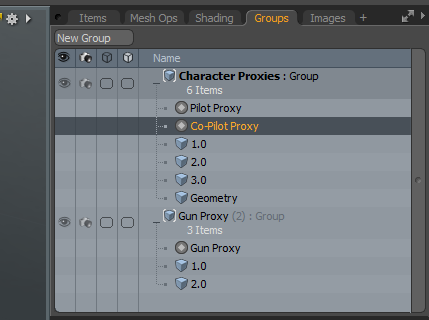
By default, proxies are not added to any LOD's on export. To attach a proxy to one or more LOD's, create
one or more groups containing both the proxy or proxies, and the meshes that they should be added to:
The proxy Path is automatically prefixed with proxy: and suffixed with the
numeric Identifier. Using the Automatic Identifier option ensures that a unique
identifier is generated for the proxy—even if the file also includes manual proxies.
Proxies are imported as proxy triangles with named selections with the proxy: prefix. Proxies
can also be manually created or copied and pasted in as regular proxy triangles with named selections.
To create memory points, create RV Memory Point items by clicking on
the Add Item button, and then on the Other sub-menu, and then on RV Memory Point.
Rename the memory point item to match the required memory point name.
A memory point is a kind of locator that is rotated and translated into the required position:
The default memory point style—Point—creates a single memory point in the
Memory LOD, at the centre of the locator. The style can be changed to generate multiple vertices
and selections automatically:
The available styles are:
Creates a single point, with a named selection matching the item name. Creates two points on the z-axis (blue axis), and places both in the same
named selection matching the item name. These memory points are typically used for animation axis. Creates a position memory point at the centre of the locator, and a
direction memory point in the forward direction of the z-axis (blue axis). The position named selection
is given the item name, and the direction named selection is suffixed with " dir". This style
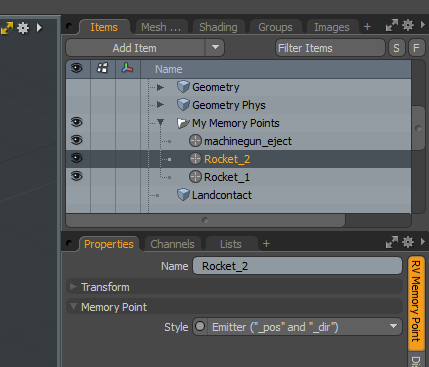
is typically used with vehicle entry actions. Emitter is identical to Directional Action, but has a position vertex name suffixed with _pos
and a direction vertex name suffixed with _dir. This style of naming is typically used with exhausts and
weapon directions.
An RV Memory Point can be parented to any Skeleton bone. Memory points that are not parented
to a skeleton bone can be placed in any other part of the item tree.
Memory points can also be created manually by creating a mesh with the name Memory, and
adding vertices with selections.
Exported meshes must contain only triangles and quads. If any exportable mesh
contains N-Gons the export fails, and (unfortunately) due to a bug in
recent versions of Modo, the full error message is not currently reported.
The plugin supports exporting animations directly to .rtm files, and importing animations
directly from both unbinarized and binarized .rtm files. Importing existing animations
quickly and accurately is important for blending new animations into existing animation states,
and for driving live vertex painting deformations to check the skinning of new character models.
Animation and rigging is a complex process, and creating new .rtm files
requires familiarity with animation hierarchy, deformers, weighting and keyframing.
The import, export and debinarization features are compatible with a typical Modo animation
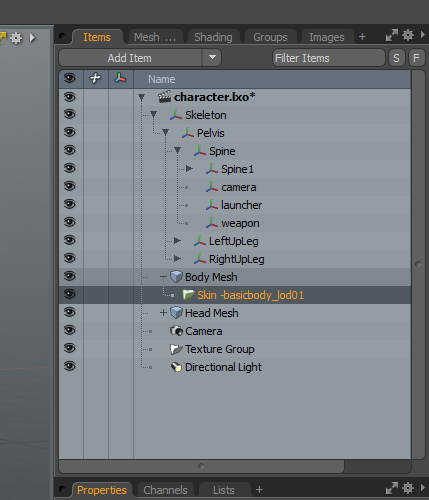
workflow, and simply use a skeleton that is defined in your scene with a tree of locators.
The locator names are matched against the bone names in the .rtm file, and should
match—in name as well as hierarchy—the skeleton as defined in your model.cfg:
The bone resting positions and rotations must be stored in the setup action. Animations and edits to the current edit
action are overwritten during import. Also, during export, the relative transformation between the setup
and evaluated transforms are used as the basis of the exported .rtm file.
The skeleton can also be made to deform a skinned character using weight maps and a normalizing weight container.
There are two rules for skeleton locator naming:
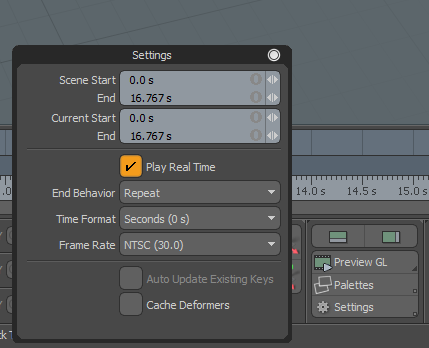
Before exporting an animation, ensure that the frames per second setting and the scene start and end times are set
correctly. The saved animation is limited to the scene times, and is automatically resampled ("frozen") during export to the framerate that
you specify:
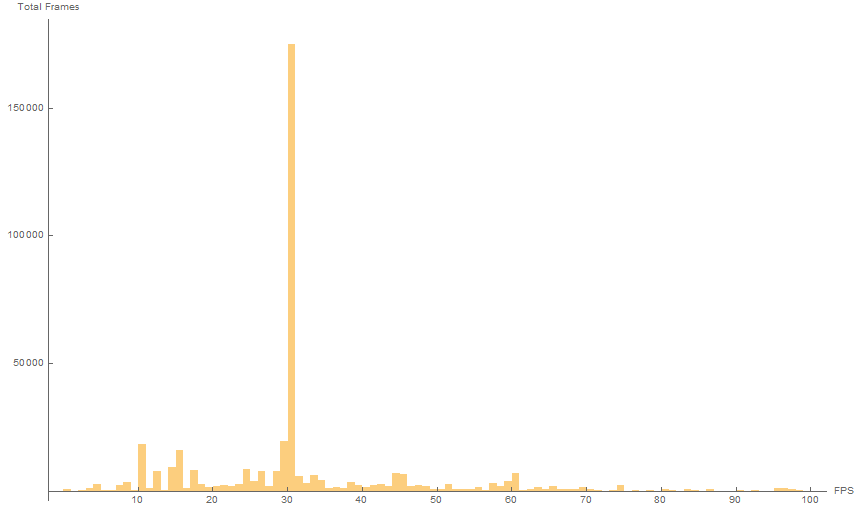
The vast majority of Arma 3 animations are captured and stored at 30 FPS. Due to the resampling process, it is not
necessary to manually freeze or add interpolation keyframes before exporting.
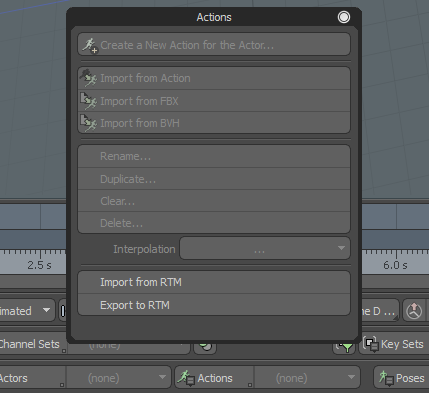
To complete the export process, open the Animate layout tab, click on Actions, and then
on Export to RTM:
Animations can be imported by opening the Animate layout tab, clicking on Actions, and then
on Import from RTM.
The skeleton must be ready at the time of import. If a binarized .rtm is being opened it is
particularly important to have the skeleton hierarchy correct. An .rtm file includes a flat
list of bones, and does not include a hierarchy that can be checked against your model skeleton. An
import of a mismatched skeleton—particularly one from a binarized .rtm file—may
simply produce a distorted animation. If an import fails to produce a correctly animated
skeleton, carefully check that your locator tree matches the skeleton that was used during binarization.
The duration of .rtm files is not stored in the file itself, and must be configured in
addon config.cpp files. Since the import process can not reliably read all config.cpp files, it
assumes that animations are 30 FPS. The Scale command in the right-click context menu of the
keyframe timeline can be used to adjust from non-standard framerates.
The use of 30 FPS as a default import frame rate was based on an exhaustive scan of all vanilla Arma 3 animations:
Requirements
Installation
Models
Levels of Detail (LOD)
Selections
Components
Normals
Sharp Edges
UV Maps
Texture and RVMAT
Mass
Properties
Proxies

Memory Points

Faces
Animations
Animation Skeletons
Exporting Animations
Importing Animations